I have been wanting to do a gallery wall in my living room for
To create my silhouette all I used is my camera phone(don't laugh, I told you I was anxious to try this out!), my sweet daughter, and Adobe Photoshop.
First step: I took a million (OK, more like 10) pictures of my daughter and hope one of them came out with her head turned the right way. I then uploaded the
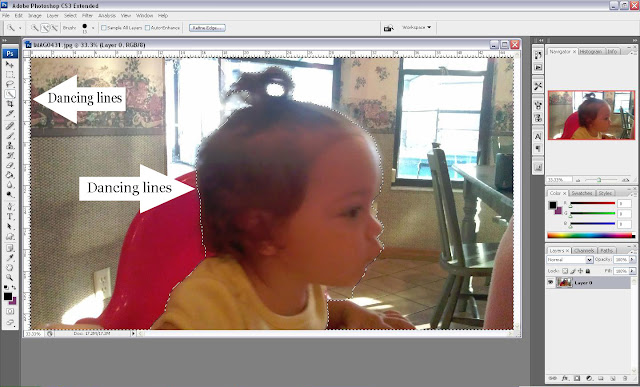
Second step: I decided to use the magic wand tool(you can also use the pen tool or the lasso tool) to trace around my daughters figure. You will see dancing lines around what you trace(if you do not see the dancing lines around the border of the picture then go to "select" at the top toolbar and click on "inverse")
Fourth step: I still had a few areas that needed to be deleted so I went in with the "eraser" tool and erased the areas I didn't want to be a part of my silhouette so what I was left with was everything I did want.
Fifth step: I went to "File" then "New" and created a new document. I wanted to print these to fit in an 8x10 frame so that is the size document I wanted. I also wanted a white background so that is the color I chose(you can chose to add it onto a patterned background etc, but for this project I just wanted it to be simple)

Sixth step: Using the "Move" tool, I dragged the picture over to the 8x10 new document I created.
Seventh step: Make sure the silhouette layer is selected. Go to "image" at the top toolbar then "adjustments" and then choose "hue/saturation". A box will pop up with "Hue, Saturation, and Lightness" Change the "lightness" value to -100. Then click OK. This will turn your image all black.
Eighth step: Drag the image where you would like it to be. I needed to rotate mine a little so it wasn't looking so "slanted". I also added a little bow. To add embellishments, just go to "file" and the top toolbar, the "open" and find what you would like to add. Once you open it, drag the item over to the silhouette picture and position it.
Ninth step: Save, Print, and Enjoy :)
Below I added some pattern paper I had saved on my computer to show you some other options you have!
If you have any questions, feel free to comment!
Jenny


No comments:
Post a Comment