Friday, April 20, 2012

Tutorial: DIY Growth Chart -- Less than $10!

There is a fact of life that everyone is aware of. We try make the best of it, sometimes avoid it and other times cherish every minute of it. But the fact is, no matter how badly we wish it wasn't so, time goes by SO fast! The worst part? When you REALLY want time to slow down, it seems like it speeds up! I feel like insert cheesy saying here it was just yesterday that I was giving birth to my twins, now they will be 18 months old in a few weeks! It makes me cry, and it also has me desperately seeking any way I can to capture their childhood which is obviously where my digital scrapbooking obsession began. Because of this, I started looking for growth charts. I found a few on Etsy that I liked but they were around $40 for ONE and I really wanted one for each of them so in the future, they can have them when they have kids to compare the heights(a mom can dream!) Then I found a tutorial here! The perfect DIY growth chart that seemed simple enough. I made a few adjustments to customize them a bit and I loved how they turned out!
I hope you like it. If you have any questions, feel free to post a comment. We would like to see your versions of growth charts as well!

Supplies:

I got the Jute Webbing from Hobby Lobby which they sale in selected stores and also online here. The stencils I used were from Walmart and they are Plaid 1 1/2 inch letter stencils. They worked perfectly because even with adding the 3/8 inch ribbon, the stencils still fit in between. 

Step 1: 
Cut jute webbing and ribbon to the size you want. I cut mine about 7 ft. I wanted a 6ft growth chart and I have a lot of extra but I wanted to be sure I had enough to cover the overlap over the dowels.

Step 2: (optional)
Add liquid stitch to the ribbon and then adhere to the jute webbing to hide the red stitching. I did this because I wanted a more customized look but I think it looks great without it as well. Let it dry for a few hours!

Step 3:
Place the dowel and wrap jute around it using liquid stitch to adhere. Then using paperclips, clip the side so that way the liquid stitch has time to bond. I have read that you are not suppose to use things to hold it together because it creates a "crease" in the fabric but because the jute is so thick, I wasn't worried about it. Let it dry OVERNIGHT!


Step 4: 
Using a ruler mark off feet and inches. Then you can go through with the stencils and add the numbers.

Step 5:
Write the info on your key tag and then attach it to the growth chart using the safety pins. 

That's it! It is a little time consuming when considering the dry time but for less than $10 each, it is definitely worth it!
These make great baby shower and 1st birthday gifts. If you go to this blog she shows a really cute way to box it up for gifting.

Check out a few pages we have done to track growth :) Go to our Facebook page to check out other pages.


Jenny

Thursday, April 19, 2012

Invitations

Whew--- it has been a while since we have posted on the blog. Apologize for that!

I want to take a moment and share a little bit about birthdays with you. As you all know Jenny and I have 3 adorable children and birthdays mean a big deal. Sadie, Jaxon, and Masen were all born in November with Sadie and Jaxon being in the beginning and Masen at the end. For Masen's 1st birthday I wanted something unique and something that years from now he will look back and say geez my mom was crazy for making all of those. So I sat down with my friend Stef and cut out over 100 circles to create a Mickey inspired invitation. (Let me just say when we were done I was jumping up and down)


Now that I look at this invitation, I think I am crazy for making it when I could have just created one on the computer!

I just completed an order for a 1st birthday invitation and I am so excited! I love that people come to us with their special events to create a one of a kind item for them. Whether it be a birthday invitation, a pregnancy announcement, a birth announcement, or just something to say hey, how ya doin'? !

If you want a little twist and flair from the ordinary store bought invitation, then let us try! I promise you that Jenny and I won't disappoint you!


You can check out all of our products at our Facebook page and remember, we LOVE custom orders so just message us for any of your needs :)

Wednesday, March 21, 2012

EASY Tutorial: DIY Photo Canvas

Ever come across a picture that you just KNOW is going to be PERFECT for something? Well it happened to me last weekend when I had a few pictures of S & J done and one shot instantly melted my heart. I saw it and I just knew my obsessive pinning of all things canvas was going to be put to the test because it would be such a cute picture to put in my office! Like I really need another thing at work to look at that makes me want to leave early and go kiss my munchkins, but that's besides the point.
This is a tutorial for a photo canvas. It is SUPER easy and practically fool proof! I did this on my living room floor while the kids were playing :)

The supplies are very basic and most crafters have everything already on hand! I printed the 8x10 picture from a home computer so I didn't even need to go to the store for that! I used a black canvas I found at Micheal's that made this project even easier then some I had seen before like at literally inspired's blog which is one of the original places I saw a photo canvas tutorial.

First step:
Use the mod podge and lightly coat the back of your image and then place it center onto the canvas.

Second step:
After letting the photo dry onto the canvas for 30 minutes, lightly coat the picture to seal it. Let dry for 15 minutes and coat again if necessary. I coated it 3 times.Your picture WILL look milky but don't worry, it dries clear. It DOES however, dry with streaks in it so paint it on all in one direction. I don't mind the streaks because I feel like it gives it that "canvas" look.

Third step:
Sponge your acrylic paint of choice(I mixed two colors together to make a "faded black look") around the edges of the photo.

Fourth step (OPTIONAL):
You could be done here because the canvas is black so no need to do anything else, but I wanted a more finished look so I added scrapbook paper to the edges. Take a piece of scrapbook paper and cut to fit the sides of the canvas. You can leave black showing because you are covering it with paint anyway.

Fifth Step:
Lightly coat the strips of scrapbook paper in mod podge and adhere to the sides. After drying for about 30 minutes, seal the strips by adding a coat of mod podge on top.

Sixth step:
Using the same acrylic paint, sponge all of the edges. I also added a coat of mod podge to the entire canvas as a final sealer.


And that's IT! You have a beautiful hand-crafted 8x10 canvas for less then $5.
If you have any questions, you can comment below. We would also love to see your DIY canvases you make!

NOTICE: The picture is still a little wet so the lines look pretty intense but they dry much softer. I was just on a time constraint so couldn't wait for it to dry fully :)

Jenny
***Don't forget to check out our Facebook page for all of your printable needs***

Friday, March 16, 2012

TGFF {Thank Goodness for Freebies}

Now that my kids are almost a year and a half I have been determined to have them start helping out around the house. Yes, I am wanting my 16 month old toddlers to have chores. I realize how dictatorial that sounds but let's face it, us mommies need all the help we can get! If that means having them throw their own diapers away or pick up the toys they routinely throw out of the playroom, then I will take it! Not only do the kids need chores but my husband does as well! This is not going to turn into a full on rant about how I want to beat my husband every time he says a snide remark about "the dishes needing to be done" or "the house needing to be swept." His exact words most times are "babe, you need to fill in the blank with whatever household chore my husband just realized needs to be done." OK, so maybe a little rant was going to come out but I just can't help it. I work the same amount of hours as my husband so there is no need for me to be the only one who "needs" to get things clean. I am a firm believer that a helpful household is a household running smoothly.
One afternoon after I put the babies down for a nap, I realized how much things HAD to change. The babies had thrown toys out of the playroom as usual and hubby just left his weights and dirty work shoes in the living room.
Now before you go judging me and thinking I must have OCD for thinking that the picture above deserves any amount of "chore planning", what the picture doesn't show is the couch full of clothes(and by full, I mean we actually gave it the name "Mt. Everest mini me") and a sink full of dishes, among a slew of other things(including two disgustingly dirty bathrooms.) I sat down on the couch and decided during this nap time I was actually going to be productive with my Pinterest ideas. I couldn't just write down our chores on a sheet of paper and call it a day. Where would the fun and motivational prettiness be in that? I decided I wanted something cute, yet functional of course. I have seen lots of chore lists that are dry erase and I figured that would be our best bet because the babies are still young enough where I need to tell them what their chore is every time they need to do it and they don't need visual aids(when they are around 2 I will do another one.) I also loved the dry erase idea because you can frame anything and write on the glass with dry erase markers! It is so easy!
I got to work and after looking at our decor in the kitchen(yes, my chore-list HAD to match) I decided on this:


As you can see, we all have our own responsibilities in the house and I am not the one feeling like I have to do everything or else it won't get done. Now, anyone can print a chore-list out and hang it, but does it really work? Well, I can tell you since I hung it up 2 weeks ago we have "checked off" what we had done twice BUT since  then, the babies already know where their dirty clothes and diapers go and they pick up their toys everyday! Hubby has done the dishes almost every night and vacuumed the living room AND one night I came home to him actually doing one of MY chores! He folded all the laundry!

If only I would have thought about this sooner!

So on to the Freebie!
I have two for you today. The one that I use for my family and a more neutral one. To Use: Download the files and open them in Photoshop. You will see the text layers where you can change the names as well as the chores. You can either print them out as 8x10 and frame them to use as dry erase or you can delete all of the text layers and then print them out and manually write the names and chores.
Click here to download freebie!

 Jenny

If you have any questions, feel free to comment. You can also visit us at our Facebook page

Thursday, March 15, 2012

Photoshop Tutorial: Silhouette Art

In true Jenny fashion I found a project I wanted to do and I ran with it. Never mind the fact that my picture quality was horrible and the angle was not right but once you see the adorableness of the project, you will understand my hastiness to try it out on my own as soon as possible!

I have been wanting to do a gallery wall in my living room for 3 years ages now but not just any gallery wall; I want a wall that is unique and more then just picture frames hanging. What better way to accomplish this then adding silhouettes of the kids onto the wall! I started searching and came across this this blog that had such a great tutorial! I followed the first fews steps pretty closely but toward the end I figured I could take a little short cut since I was just wanting a black silhouette for now.

To create my silhouette all I used is my camera phone(don't laugh, I told you I was anxious to try this out!), my sweet daughter, and Adobe Photoshop.

First step: I took a million (OK, more like 10) pictures of my daughter and hope one of them came out with her head turned the right way. I then uploaded the decent horrible quality picture to Adobe Photoshop.
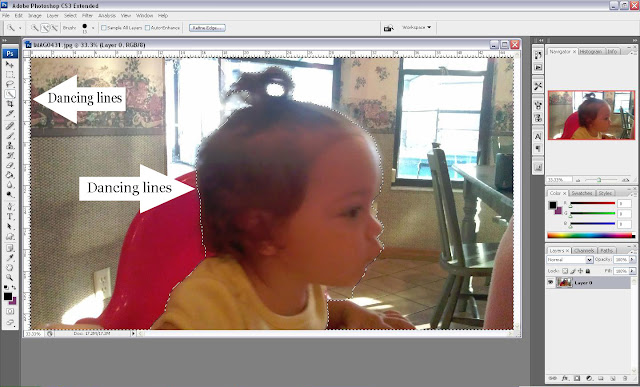
Second step: I decided to use the magic wand tool(you can also use the pen tool or the lasso tool) to trace around my daughters figure. You will see dancing lines around what you trace(if you do not see the dancing lines around the border of the picture then go to "select" at the top toolbar and click on "inverse")

Third step: Hit the "delete" button on your keyboard and watch all the ugly background disappear :)
Fourth step: I still had a few areas that needed to be deleted so I went in with the "eraser" tool and erased the areas I didn't want to be a part of my silhouette so what I was left with was everything I did want.
Fifth step: I went to "File" then "New" and created a new document. I wanted to print these to fit in an 8x10 frame so that is the size document I wanted. I also wanted a white background so that is the color I chose(you can chose to add it onto a patterned background etc, but for this project I just wanted it to be simple)

Sixth step: Using the "Move" tool, I dragged the picture over to the 8x10 new document I created.
 Seventh step: Make sure the silhouette layer is selected. Go to "image" at the top toolbar then "adjustments" and then choose "hue/saturation". A box will pop up with "Hue, Saturation, and Lightness" Change the "lightness" value to -100. Then click OK. This will turn your image all black.
Eighth step: Drag the image where you would like it to be. I needed to rotate mine a little so it wasn't looking so "slanted". I also added a little bow. To add embellishments, just go to "file" and the top toolbar, the "open" and find what you would like to add. Once you open it, drag the item over to the silhouette picture and position it.
Ninth step: Save, Print, and Enjoy :)

Below I added some pattern paper I had saved on my computer to show you some other options you have!

If you have any questions, feel free to comment!

Jenny

Tuesday, March 13, 2012

How Digital Scrapbooking saved my SANITY!


Sitting at home completely overwhelmed about being a semi-single mother (hubby was in Afghanistan) of a newborn, I wanted NEEDED something to keep me from going insane. Eat, Sleep, Poop, Repeat! My mind was on auto pilot! Masen was all I did – all day long! Nap time (YAY) means Mommy time! What do I do? I sit at the computer and stare at all of the pictures of my beautiful red headed baby! I decided I really need to start on Masen’s baby book but I didn’t want just an old boring baby book! I wanted something that my son would be honored to show his future wife and children! Something that he would look at and with a smile from ear to ear say my mom made this! I had NO clue what to do until my mom gave me a book that she had made with wedding pictures from my wedding. I really liked that idea, so I enlisted the help of my mom. All I needed was a computer, photoshop, digital scrapbook kits, pictures and a little bit of patience! I created my first scrapbook page on June 2, 2011! I knew instantly that this is what I had envisioned my son showing his family in the future! I set my self a deadline, November 22, 2011, (Masen’s 1st birthday) to complete the first year! I was a little shy of the date but I DID it! I completed the first year of my son’s life right there on my computer!


                                        My first ever digital scrapbook page


If you want to see more of Masen’s scrapbook please check out our page at www.facebook.com/from.memories.2.scrap (Be sure to like us too J )

Want to digital scrapbook? 

Here’s how to start!

1.       Get a computer (obviously)

2.       Download the trial of Adobe Photo Shop

3.       Download a digital scrapbook kit
  Some of my favorite sites

a.       www.noreimerreason.com

b.      www.everydaymomideas.com (more than just kits)

c.       www.suzyqscraps.com 

YOU CAN GOOGLE ANY FREE DIGITAL SCRAPBOOK TO FIND KITS (Make sure to give credit if you post) 

4.       Settle down in a comfy place

5.       Look for the pictures that you might want to use

6.       Get started and don’t forget to add your own uniqueness!

Happy Scrapping!
         AMANDA

We're new here!

6 hours into our day and 24 Pinterest ideas later, we decided to start a blog! We are forever finding new ideas to try and we thought it would be a great way to share some of them with other people. We have no idea where it will lead but we thought it would be a great compliment to our newly opened FB page where we sell custom printable products like scrapbook pages, birthday supplies, greeting cards, and other things. You can visit us here: https://www.facebook.com/FromMemories2Scrap


**About us**
Jenny: I have a wonderful husband who has put up with my craziness for 3 years and counting. We have two BEAUTIFUL kids together. Jaxon is our 16 month old son. He is our rough little man but scared of almost anything and he has no shame in running to his mommy's legs and clasping on for dear life. Sadie is our 16 month old little girl. Yep, I have toddler twins on my hands! Sadie is a girly girl(at least for now while I am dressing her) and she amazes us everyday with how quickly she learns. As for me, I am loving the mommy life and I enjoy spending time with my family more than anything. Second best in life is my digital scrap booking hobby that has now blossomed into a full fledged Photoshop obsession.

Amanda: I have a crazy wonderful husband who has put up with my quirkiness for 6 years and many more to come! We have one child who steals my heart every time he smiles! Masen is 15 months old. He is ALL boy! Loves to climb, fall, play, be outside, chase the cat, and most of all love his Mama! As for me, I am a stay at home mom and believes that my job is the most rewarding EVER! I am COMPLETELY obsessed with digital scrap booking and I am so glad to have found someone like my friend Jenny, to share in this crazy wonderful obsession!!

We are both wives and moms so of course we will be sharing about our kids :) and our lives in general but we also want this to be a good place for you to learn about Photoshop, how we create some of our scrapbook pages, and different ideas we come across and try.
Thanks for stopping by and we will be posting our first project SOON :)